We deployed in 2005 an electronic documents management solution for a customer based on Hummingbird eDocs DM 6. The customer used the solution to archive all his paper documents. The solution is perfectly working and covering all his needs. Except that it is deployed on Windows Server 2003 and it's time to move to more recent supported versions of windows and eDocs.
If you are in the same situation, you already know that the version 6 of eDocs DM was discontinued in favor of OpenText Content Server. In our case, the best solution is to migrate to eDocs DM 10, which is an updated version of eDocs DM 5.
If you are reading this and you are not familiar with OpenText eDocs DM, know that version 5 and 6 are two different products. Version 5 was updated to version 10.
The problem is that there is no official automated path for migration from version DM 6 to 10. I have no choice but to quickly create a migration tool.
The tool I wrote will not migrating everything. My customer has the following:
- Each document has only one version
- Each document is composed of two files. A PDF file that hold the content and a TXT file which is the OCR result of the pdf. The library is configured to use the TXT file for the index
- Access logs and other information are not important
I want to share this with you in case you face the same scenario.
How the customer uses the solution
As I said earlier, the customer uses the solution to archive his paper documents. The end user uses a scanner to scan the documents. The scanner is configured to produce a PDF file and save it in preconfigured folder. Once the PDF is available, a preconfigured Omni Page job is already monitoring the same folder and start the OCR operation automatically. The OCR result is saved automatically in text file in the same folder and the same name as the pdf file.
Meanwhile, another application deployed as DM Extention add-on is running and monitoring that same folder. Once the PDF file and the TXT files are present, the application automatically create a profile and display a form to the user to put more information about the document. Once the user hit save, the application saves the profile and uploads the files. Original files are then deleted form the disk.
DM Extention and Webtop are used to search and access different documents.
How the migration tool works
The basic idea is to read all profiles from DM 6 and copy them to DM 10. Here are the steps:
1 – Connect to DM 6 SQL Server database directly
2 – Read a profile from the database
3 – Create a profile in DM 10 using DM API
4 – Copy all profile fields (Name, abstract, author …etc. and any user custom field)
5 –Save the profile and upload the files
6 – Repeat the same steps for the remaining profiles
Things to de manually before the migration
Before the migration, we should do the following:
- Create the target library
- Configure all the custom fields and lookup as the old one. The tool will just copy data, it will not create missing fields.
- Create and map the same users as the old library
- In the target library, ensure that there is a profile that include all custom columns to be used for the migration.
How to use the migration tool
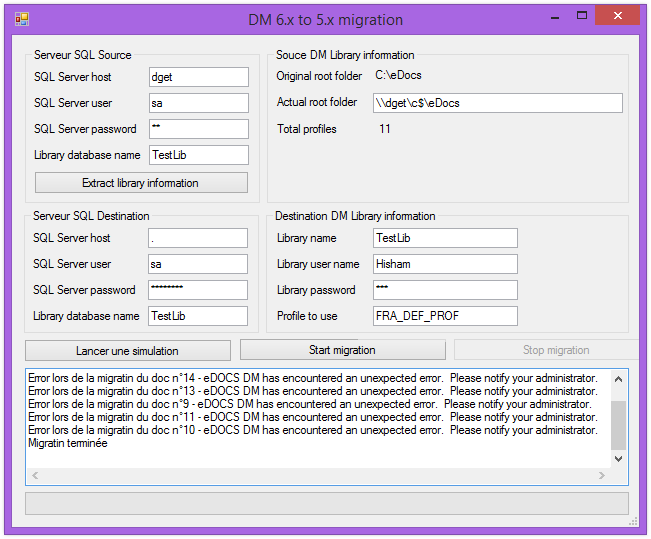
When you launch the tool, it asks for the following information:
- Source SQL Server info : these are the information to connect to DM 6 database directly
- Source Root Folder : Is the folder where documents are stored by DM. This folder should be the root folder of the library.
- Destination SQL Server info: information of DM 10 SQL Server database. It is used to check profile custom fields.
- Destination DM 10 Library: information to connect to the target library.

Figure 1: migration tool screenshot
Destination Lib requires you also to provide the profile to use. If you work in English the default profile is "DEF_PROF", but if you work in a multi-culture environment this name could be different. In a French installation of eDocs, the default profile is "FRA_DEF_PROF". You can create a profile to use for the migration, just ensure that all custom columns are there.
I created the tool with French and English in mind. Other values also depend on the installation language. For example the default document type Id is different. In English is "DEFAULT" and in French is "PAR DÉFAUT". Internally the application convert these two values. Change the source code to cover your needs.
Simulate the migration
When you click the "Lancer une simulation" the tool check the following:
- Access to files: it will read all profiles and check corresponding files existence in the root folder
- Profile customization: it will check if all existing custom field in the source library are applied to the target library.
- Connection to the destination Library: if the provided credentials are correct
Source code
You can download the source code from my github page.